Get timber fixing right onsite
Fixings and connectors for timber framed construction have developed over the years to a high level of performance to provide a secure and reliable system in dealing with the internal loads and external forces on a building. However, mistakes are often made in this area which can jeopardise the structural integrity of the building.
Traditional fixing methods for the range of engineered supports, connectors, ties, brackets and bracing predominantly use nails, screws, bolts and nail plates in a variety of combinations for roof and floor trusses, wall frames, engineered beams and every timber component in a building frame.
These very efficient connection systems maximise structural performance, minimise cost and reduce the time required for installation onsite. However, the specified number and location of fixings is a critical factor that needs to be observed to ensure correct performance.
Nails are the most common, cheapest and easiest fixing, but in many cases high loadings on the connector will require screws to be used, which take longer to install but have a load capacity of two and a half to three times more than a nail. And if the loads are very high, such as with truss boots, bolts are required as they will support up to 10 times the load.
Importantly, builders need to be aware that the combination of connector and fixing products they use meet the design criteria for which they are intended, and are correctly selected so as not to compromise the structural integrity of the completed timber frame.
When selecting connectors you need to know the structural load requirements which are usually determined by three factors: the area wind classification, load to be supported by the connection and timber joint strength group.
Local suppliers of engineered connectors provide comprehensive technical data sheets containing tables for product selection and fixing details to ensure the correct product is used. They also offer engineering assistance if there is any doubt on product selection or installation, to ensure you are meeting requirements of the Building Code of Australia and relevant Australian Standards.
According to Ian Hayward, national design services manager for Pryda Australia, there are many examples of incorrect installation that unfortunately lead to problems from movement within the building frame well after the job is completed, simply because the instructions were not followed.


“A common problem arising is with truss top chord bracing, where the fixing requirements are overlooked and the effectiveness of roof bracing is significantly reduced,” Ian explains.
“The truss installation standard AS4440 and truss installation instructions provided by all truss suppliers comprehensively cover the details for Speedbrace which is to be adequately fixed to wall plates or truss heels.
“Correct nail fixing at the ends is very important as the bracing has to be able to develop a minimum tension capacity for it to be effective, and often due to a lack of understanding not enough fixing nails are used, or they are installed incorrectly (see Images 1A and 1B).
“Speedbrace should be end fixed to truss top chords at the apex by bending over and around the side face of the chord, then fixed by using five nails – with two to the chord edge and three to the side face.
“When fixing to wall plates, the Speedbrace should be wrapped under the top plate and two nails fixed into the side face of the wall plate, and three nails on the underside of the wall plate.
“These end fixing details are required so that the Speedbrace is capable of resisting a tension force of 8.4kN which is roughly 840kg of weight, the equivalent of some 10 people hanging from it!”
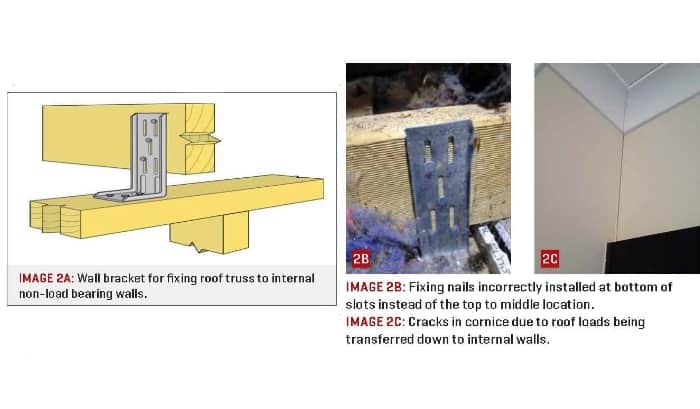
Another recurring problem is in the nailing of wall brackets used to stabilise non-load bearing walls by fastening the wall top plate to the truss bottom chord. This bracket has fixing slots which allow vertical movement of the truss over time without transferring any load to the wall.
Timber roof trusses are designed to settle when the roof tile and plasterboard loads are added to the structure and the wall brackets are designed with nailing slots to allow the truss to deflect vertically. To accommodate this movement, nails should be fixed at the middle to the top of the slots so that the truss can effectively settle without transferring any load down to the internal walls.

A common issue is where internal wall brackets have been incorrectly nailed at the bottom of slots which allows truss deflection to add loads to the internal walls, typically resulting in cornice cracking especially over bulkheads (see Images 2A, 2B and 2C).
An even more serious problem can arise frominadequate fixing of bolts to secure highly loaded truss boots, which could lead to disastrous consequences.
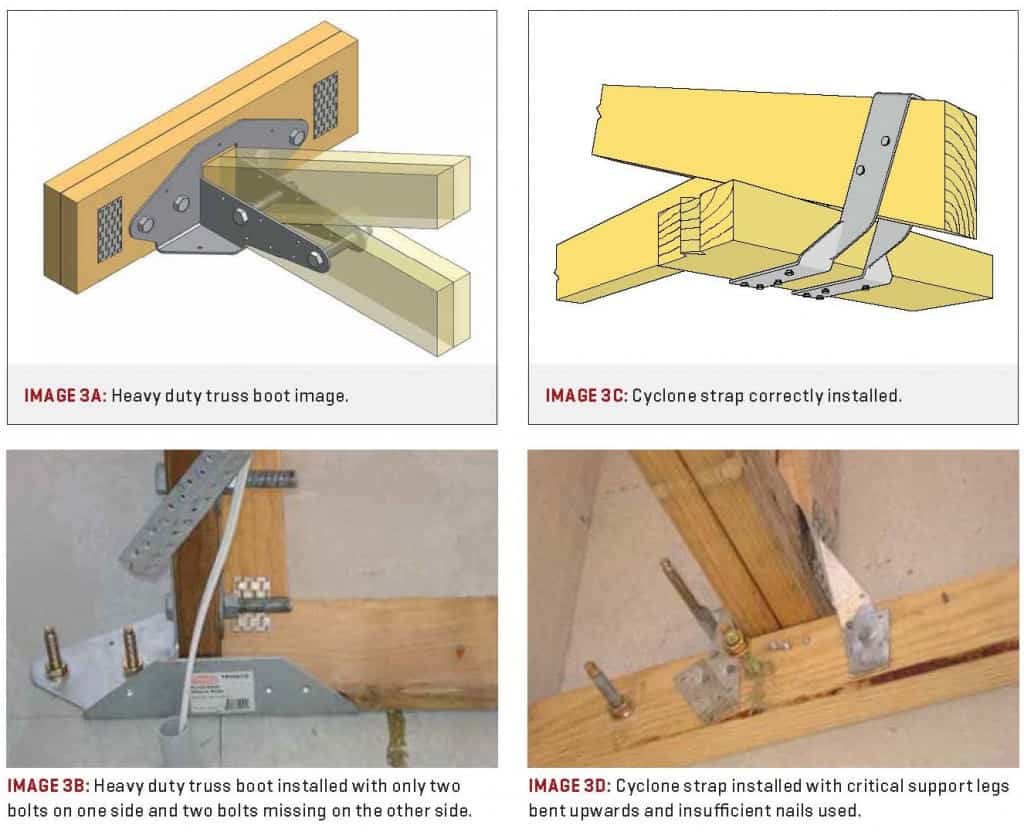
Heavy duty truss boots are used where girder trusses and large span roofs are being supported not only for the roof loads but to resist twisting and other forces. In these applications they need secure fixing by at least four bolts with two on each side to develop their full design capacity.
Image 3B shows a truss boot with only two bolts on one side as the final truss to be installed was in the way. The carpenter decided not to worry about installing the other two bolts, severely compromising the capacity of the truss boot to support the roof structure and potentially causing a major failure.
While these examples of incorrect installation show a lack of care and understanding of connector fixing requirements, it is fortunate that most onsite work is done correctly and within the codes and Australian Standard specifications. But mistakes are often being made, so be sure that your timber connectors and fixings are in line with the recommended installation procedures provided by your supplier.
For further information visit the Pryda website, www.pryda.com.au
Kevin Ezard provides business communication and marketing consultancy services to the timber and wood products industry, and organises the Frame Australia Conference and Exhibition.
